
What Causes Polymeric Joint Sand to Wash Out of Paver Patios
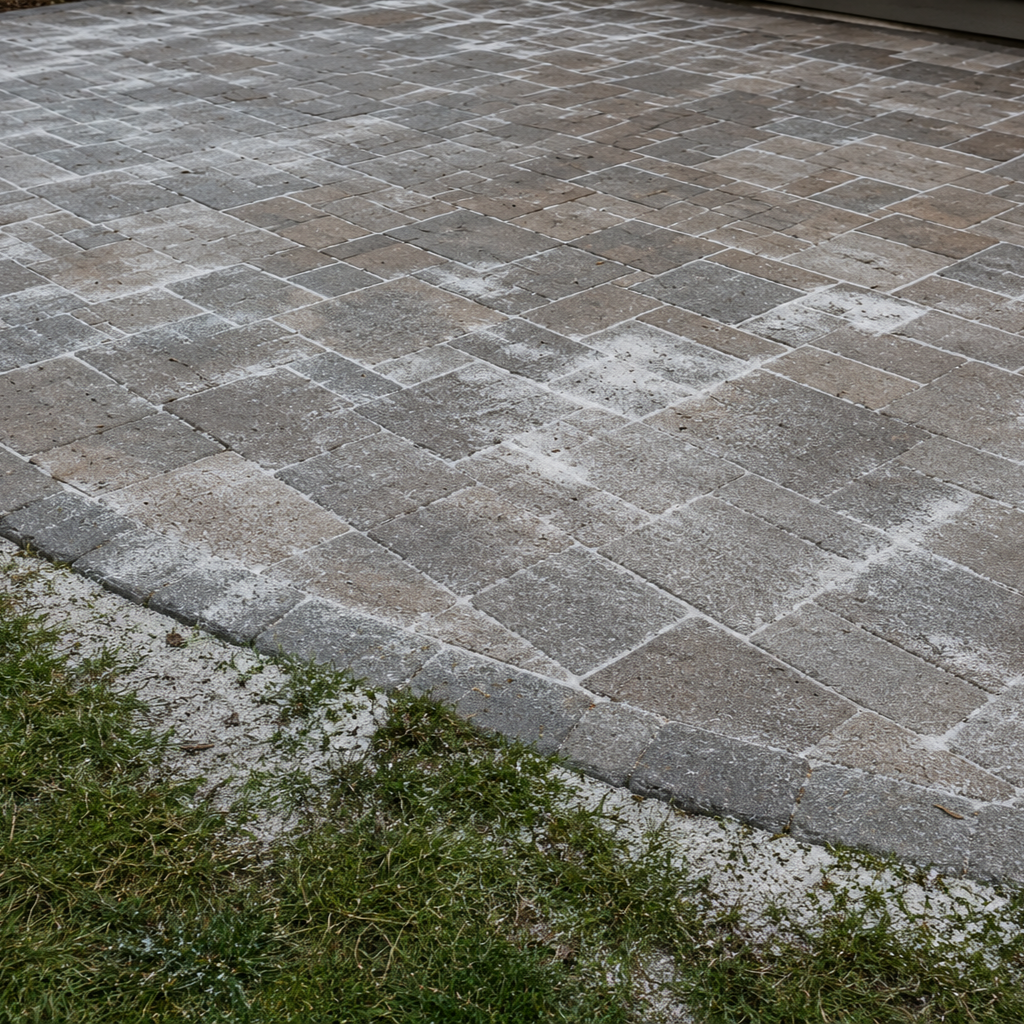
You are sweeping the patio after a thunderstorm, and the broom is pushing little piles of gray-white powder around. That powder is supposed to be locked into the joints between your pavers — a hard, weed-resistant filler that doesn't wash out, doesn't crack, doesn't shift. Instead, it's sitting on top of the stones, in fans across the lawn where the patio meets the grass, and in a chalky stripe down the driveway where the runoff drained off.
You paid for this two summers ago. The job looked perfect on day one.
Now it's failing.
What polymeric sand is actually doing in those joints
Polymeric sand isn't sand. It's sand mixed with a polymer binder — a powdered glue that activates when it gets wet. The installer sweeps the dry mix into the joints, vibrates or tamps it down, sweeps off the excess, then wets the entire surface with a fine mist. The water triggers the polymer to set into a flexible, water-shedding crust that locks the sand grains together and locks the pavers in place.
When it works, the joints look gray and matte, feel firm to a fingernail, and shed rainwater off the surface instead of letting it pool down into the base.
When it doesn't work, you've got loose sand sitting in joints that look like they were vacuumed out — because that's what every hard rain is doing to them.
What polymeric sand looks like at year one, year three, and year five
How a job ages is a clearer diagnostic than any single symptom. If your patio is acting older than it should, match it to where it ought to be on this timeline.
Year 1. Joints look gray, matte, and firm. A fingernail can't push through. Rainwater beads and runs off. If you're seeing loose sand, gray streaks, or sand washing into the lawn the first season, the polymer never activated — water was too light, too heavy, or applied to a damp surface. High urgency. Pavers will start shifting within a year.
Year 2. The crust may darken slightly from the sun. A few hairline cracks at joint intersections are fine; joints still feel locked. If sand is disappearing from one section while the rest holds, that's base failure — gravel under the bad section is moving. High urgency. Inspect the base before re-sanding.
Year 3. A contractor-grade job still looks tight. A bargain-brand product may be done — fans of sand at downspout outlets, weed seedlings in the wettest joints. If those signs show on a contractor-grade job, the product was expired or never cured. Medium urgency. Redirect water flow, then re-sand.
Year 4. Wider hairline cracks across the joint surface. Flex tolerance is dropping. A paver sealer re-coat can buy another year or two. Low to medium urgency — light maintenance now is cheaper than full re-sanding later.
Year 5. Contractor-grade jobs are at the planned end of life. Joints are visibly thinner. Weeds are frequent. Plan a full re-sand. If a younger job already looks like this, something failed early — install, product, or a pressure wash that blew the crust apart. Re-sand and switch to soft wash chemistry going forward.
The 30-minute window during installation that decides everything
The single biggest reason polymeric sand fails is the activation step. A polymeric sand job lives or dies in the thirty minutes between sweeping in the dry sand and walking away from the wet patio.
Too little water and the polymer in the deeper part of the joint never gets wet. The top half-inch sets up like cement and looks fine on day one, but the unreacted powder underneath stays loose. The first heavy rain that gets through the surface washes it out from the inside, and the surface crust collapses into the hollow it left behind.
Too much water — or water hitting the surface as a stream instead of a mist — washes the polymer out of the joints before it has a chance to set. You can see it on day one as gray streaks running off the pavers onto the surrounding hardscape. By the next morning the joints are soft and the sand is loose.
The right activation: a fine mist in three or four passes, each one allowed to soak in for sixty seconds before the next pass, until the surface stops absorbing water and starts pooling lightly on the joint surface. Then the patio gets left alone for twenty-four hours.
There's also a step that has to happen before the sand goes in. The pavers and joints have to be bone dry. Morning dew, a damp surface from a rinse the day before, even high humidity that's left moisture in the joint — any of it will trigger the polymer to start setting in the wrong place. The sand cakes onto the paver surface as haze, sets up too early in the upper joint, and never bonds to the joint walls below. A patio installed on a humid morning before the dew burns off often looks streaky on day one and starts losing joint sand within months.
The other dimensional rule that matters: joints need to be at least an inch deep and between one-eighth and four inches wide, with the sand surface filled to about one-eighth of an inch below the top of the paver. Joints narrower than that don't let water reach the bottom of the joint during activation. Joints wider than four inches let water flow through them like a channel and wash the polymer out before it sets.
Most failed jobs we get called to re-do failed at one of these steps. The installer rushed the misting, used a regular hose nozzle instead of a misting head, started before the dew burned off, or got partway through the wetting cycle and noticed rain in the forecast and tried to rush it.
Pressure washing is what finishes off a marginal job
A polymeric sand crust can survive a lot of weather. What it can't survive is 2,500 PSI from a wand held twelve inches off the surface.
The polymer crust is flexible, not bulletproof. It's designed to handle foot traffic, sun, freeze-thaw, and direct rainfall. Direct pressure from a residential or commercial pressure washer cuts straight through it, blows the underlying sand out of the joint, and leaves an empty channel that fills with dirt and weed seed by the next spring.
This is the most common way a five-year-old paver job gets ruined in an afternoon. The patio looked dingy. The homeowner — or a cleaning company that didn't know better — pressure washed it on full power. The pavers came up bright. The joints came out completely.
A patio with a healthy polymeric sand layer should be cleaned with a soft wash chemistry — biocide for algae, surfactant for grime, low-pressure rinse — or with a surface cleaner attachment that distributes the pressure over a wide ring instead of concentrating it at a single point in the joint. We see this mistake constantly when we get called to look at a patio that "started losing sand right after we got it cleaned."
When base failure looks like a polymeric sand problem
Sometimes the polymer is fine. The base is what's moving.
Polymeric sand is meant to lock individual pavers to each other, not to lock the entire patio to the ground. If the gravel base under the pavers is settling, washing out, or frost-heaving, the pavers shift in relation to each other. The joint widens. The polymer crust cracks. The sand inside falls out.
Tells that point at base failure instead of sand failure:
A specific area of the patio shows joint loss while the rest holds. Pavers in that area feel uneven underfoot or rock slightly when you step on them. The joint gap is visibly wider than on the rest of the patio. Sometimes there's a low spot where rainwater collects and drains down into the base.
Re-sanding a patio with base failure is throwing money at a symptom. The base needs to be lifted, the failed section excavated, the gravel re-compacted, and the pavers reset before any sand goes in. A pro should be able to point at the failing area on day one and tell you what the underlying problem is — settling base, lost edge restraint, tree root displacement, or freeze-thaw movement.
If the company quoting your re-sand isn't talking about the base at all, they're going to be back next year doing it again.
Why the wrong product fails before it ever gets installed
Not all polymeric sand is the same product. The cheap bargain-brand bags at big-box stores use a weaker polymer system and a higher percentage of fine dust. They install easier — sweep nicely, activate with less water — and fail faster.
The contractor-grade products use a higher polymer content, a graded sand mix that locks in tighter, and a more forgiving activation window. They cost two to three times what the consumer-grade product costs by the bag, and they last five to ten years instead of two to three.
Then there's age. Polymeric sand has a shelf life. A bag that's been sitting in a hot garage for two summers may not activate fully even when installed perfectly — the polymer has already partially cured from humidity exposure, and what's left in the bag won't bind into a proper crust. A homeowner doing a touch-up with last summer's leftover bag often finds the touch-up failing within months.
Check the date code on the bag. If it's more than a year old, throw it out and buy fresh.
How a real re-sand differs from sweeping new sand into the joints
If a homeowner can sweep loose sand into open joints from a hardware-store bag and call it a re-sand, the joints get clean-looking again for about a week. Then it rains and the loose sand washes back out — because the old polymer crust is still in the joint, the new sand is sitting on top of it, and the new polymer never reaches the deeper voids it's supposed to fill.
A real re-sand looks different. The crew vacuums or air-blows the existing failed sand and broken polymer out of every joint, down to the depth of the paver. They check the base for movement. They re-set any pavers that have shifted. They sweep in new polymer sand at the correct depth, work it into the joints with a vibrating plate or hand-tamping tool, sweep the surface clean, and then do the controlled misting activation in three or four passes.
If the patio also needs cleaning before the re-sand, we do that with a soft wash patio and pool deck cleaning chemistry that lifts the dirt and algae off the paver surface without blowing out the joints we're about to refill. Pressure-cleaning a patio that's getting re-sanded the same day is the cleanest way to start the job.
The whole sequence takes a full day on most residential patios. It costs more than the homeowner-version because the failure modes that put us there in the first place don't get fixed by sweeping in another bag of sand.
Frequently Asked Questions
The sand is the joint. The joint is the patio.
A polymeric job that holds isn't the one with the most expensive sand. It's the one where the field was set right, the joints filled to depth, and the activation water held long enough to set the polymer through. Get those right and the patio looks tight at year ten.
Superior Power Washing handles paver patio cleaning, sand removal, and re-sanding across Waldorf, MD, and all of Charles County and Southern Maryland — including La Plata, Brandywine, White Plains, Hughesville, and Charlotte Hall. Soft chemistry on the surface, careful vacuum sand removal, precise re-fill on a dry-set joint. Call (240) 901-4252 for a free on-site assessment.
